Using the Instrument Driver Development Wizard
The Instrument Driver Development Wizard automates the creation of the source, include, and function panel files for controlling an instrument. You create an instrument driver from an IVI instrument class template, an existing driver for a similar instrument, or the core IVI driver template.
Before using the wizard, complete the following worksheet with the appropriate information for your instrument. You need this information to complete the wizard.
Driver Information
Instrument Driver Name: ______________________
Prefix: __________________ (two-character vendor code followed by non-whitespace characters that uniquely identify the driver)
Target Directory: ____________________________
Developer Information
Name: _____________________________________
Company: __________________________________
Phone: _____________________________________
Fax: _______________________________________
Standard Functions (if supported by the instrument)
Default Setup Command: ______________________
ID Query Command: __________________________ (*IDN? if it uses SCPI commands)
ID Query Response: ___________________________
Reset Command: _____________________________
Reset Delay: _____________________ (time required for reset to execute and return)
Self-Test Command: __________________________
Self-Test Response Format: _____________________ (self-test code and/or message)
Self-Test Delay: __________________ (time to allow self-test to execute and return)
Error-Query Command: ________________________
Error-Query Response Format: __________________ (error code and/or message)
Revision Query Command: _____________________
Revision Query Response Format: _______________
Test Information
VISA Resource Descriptor: _____________________ (for example, GPIB::5::INSTR)
To launch the wizard, select Tools»IVI Development»Create IVI Specific Driver in LabWindows/CVI. Follow the instructions on each panel of the wizard using the information from the worksheet. The number and types of panels that appear vary according to the selections you make.
Selecting an Instrument Driver Template
After you click Next on the initial wizard panel, you can copy an existing driver or create a new driver, as shown in the following figure.

If you choose to copy an existing driver, you must specify the pathname of the .fp file for the existing driver. The wizard copies the .fp, .c, .h, and .sub files of the existing driver to the target directory that you specify later in the wizard. The wizard uses the instrument prefix that you specify later in the wizard as the new base filename.
The wizard builds new drivers based on predefined instrument templates. If you choose to create a new driver, you must first select the type of I/O interface you want to use to communicate with the instrument. You must then select from a list of predefined instrument templates. The list of templates can vary depending on the I/O interface you select.
Select a template that best matches the capabilities of your instrument. Most predefined instrument templates define a complete driver architecture with functions and attributes for a particular type of instrument or device. An exception is the General Purpose template. The General Purpose template appears in the list if you choose GPIB, Serial, VXI message based, or VXI register based as your I/O interface. When you select the General Purpose template, the wizard generates skeleton driver files that can use the IVI Engine for managing attributes and that follow the basic VXIplug&play guidelines for instrument drivers. The skeleton driver files define no functions, attributes, or utility routines other than the ones that the IVI Foundation requires. Use the General Purpose template only when no predefined instrument templates apply to your instrument. Refer to the IVI Foundation Web site for descriptions of the class drivers that the predefined instrument class templates represent. The instrument class templates incorporate all the features of the general purpose template as well as the features in the instrument driver class templates.
Running the Preliminary I/O Tests from the Wizard
If you select GPIB, Serial, or VXI message-based as your I/O interface, you can run preliminary I/O tests to verify that the information you have provided is accurate before the wizard generates any code. Enter the appropriate information in the Test dialog box and click Run Tests. The wizard launches a separate application that sends commands to the instrument for ID query, self-test, reset, and so on, and parses the instrument response based on information you provide in the wizard. After the tests execute, the wizard generates a report that describes the success or failure of each operation. If any failures occur, you can click Back to return to the appropriate wizard panel, update the information, and try the tests again.
After the tests execute successfully, click Next to generate the .fp, .c, .h, and .sub files for the instrument driver.
After the wizard displays the newly created files, you can launch the Attribute Editor, which NI recommends you use to complete the instrument driver.
Reviewing the Generated Driver Files
The wizard generates all the required files for an instrument driver. If you use the General Purpose template, you must design a function hierarchy with function definitions and attributes on your own. You must build function panels and write the source code to implement these functions. Refer to the Function Tree Editor , Function Panel Editor , and Adding Help Information topics of the LabWindows/CVI Help for instructions on building function panels.
If you use a predefined instrument template to generate driver files, your instrument driver files have predefined functions, function panels, and attributes. You must complete the source code by adding the appropriate command strings for your instrument and the code for parsing response strings.
Generated Function Panels
Your instrument driver function panel file displays all the instrument capabilities in a function tree. The wizard builds all the function panels automatically and includes online help for the function classes, functions, and parameters.
.sub File
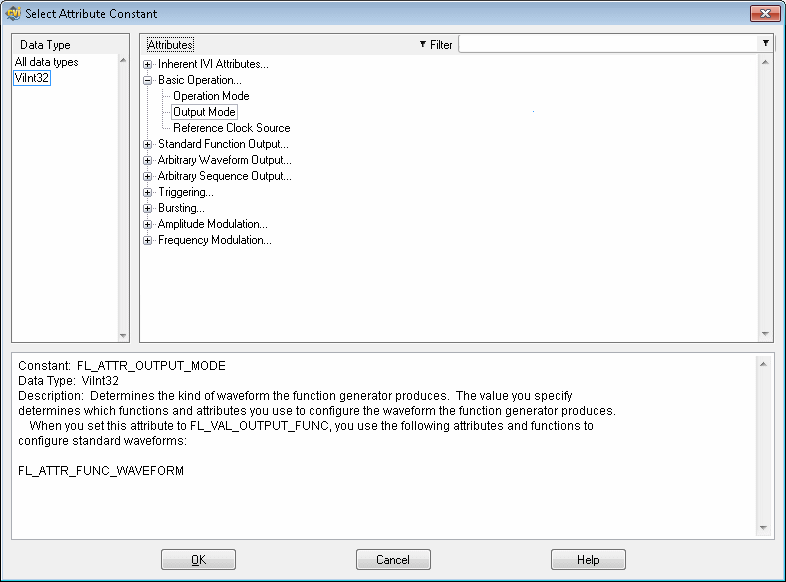
The .sub file contains information about instrument attributes and their possible values. This information appears to the user through the GetAttribute and SetAttribute function panels. To view this information, open one of the SetAttribute functions from the Configuration Functions class in your driver. Click the Attribute control to display the Select Attribute Constant dialog box, as shown in the following figure. You can select each attribute to view the possible values for that attribute in the lower half of the dialog box.
Where possible, the include file for the driver defines constants with intuitive names for each of the attributes and their possible values.
Add information to the .sub file by selecting Tools»IVI Development»Edit IVI Specific Driver Attributes, which launches the Attribute Editor. When you apply the changes that you make in the Attribute Editor, the Attribute Editor updates the .c, .h, and .sub files for the instrument driver.
Source File
When you use the wizard with a predefined instrument template, the wizard groups the functions in the driver source file into the following categories:
- Initialize Functions—The wizard completes these functions for you automatically.
- Configure Functions—These functions set instrument attributes or groups of instrument attributes. For example, an oscilloscope has a ConfigureVertical function that sets the vertical range, offset, coupling, and probe attenuation for a particular channel. The wizard completes the code for the configure functions automatically. The code for each configure function consists of calls to an Ivi_SetAttribute function for each configuration parameter.
- Data Functions—These functions query the instrument for data. You must complete the source code for these functions to send the appropriate query commands to the instrument, then parse and scale the data the instrument returns.
- Action/Status Functions—These functions either initiate an action on the instrument or check the status of a particular operation. An action function might initiate an action by sending a trigger to the instrument. A status function might check whether an acquisition is in progress for an oscilloscope. You must complete the source code for these functions.

Note Some predefined instrument templates, such as the DMM template, combine the data functions and action/status functions under the term Measurement Functions to present a more intuitive function hierarchy to the user. - Utility Functions—The wizard completes these functions for you automatically.
- Attribute Callback Functions—These functions contain the code to read, write, or check attribute values. For example, the code to query and modify the oscilloscope vertical offset setting must be in the VerticalOffsetReadCallback and VerticalOffsetWriteCallback functions. You must complete the source code for each of these functions by inserting the appropriate command to set or query the attribute value on your instrument.
- Session Callback Functions—These functions contain the code to perform various actions such as checking the status of the instrument. You must complete the source code for each of these functions.
- Close Function—The wizard completes this function for you automatically.
Include File
The include file contains function prototypes and defined constants for your instrument driver. The defined constants provide unique constant names for the attributes and attribute values your driver uses. Modify the include file only if you add, delete, or modify functions in your driver or if you add new attribute values.
Extended Functions and Attributes
The generated driver files can include functions and attributes that your instrument does not support. The instrument templates define the fundamental capabilities of each instrument type and extended capabilities that not all instruments support. For example, the DMM template includes functions and attributes for making multipoint measurements with scanning DMMs. If you are writing a driver for a DMM that does not support scanning, you must delete the functions and attributes from your driver.