Programming with Digital Graph Controls
This topic describes how to complete the following tasks programmatically.
- Creating a digital graph
- Customizing axis labels
- Customizing bus and line labels
- Customizing state labels
- Deleting plot lines from a digital graph
- Interleaving data samples
- Optimizing graphing speed
- Plotting data
- Sizing plots
- Specifying dates and times for axis values
- Specifying how the digital graph displays values
- Specifying how the digital graph scales
- Specifying the display format of the x-axis
- Understanding digital graph basics
- Using the digital graph with NI-DAQmx
Understanding Digital Graph Basics
The following image illustrates a basic digital graph plot.
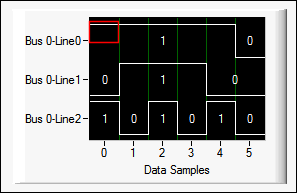
In this example, the data is divided into three lines, all of which are part of the same bus. The digital graph displays six data samples for each of the lines. Line numbering, bus numbering, and sample numbering are zero-based. The red outline marks the first data sample for Line 0.
The digital graph records the values in the data array from top to bottom along the y-axis. That is, the first data array value corresponds to sample 0 for Line 0, the second data value corresponds to sample 0 for Line 1, the third data value corresponds to sample 0 for Line 2, the fourth data value corresponds to sample 1 for Line 0, and so on. Notice that if consecutive data samples for a line have the same value, for example the first five data samples for Line 0, the plot does not mark the distinct samples. Use the x-axis grid, shown in green in this example, to delineate the separate data samples. The numbers above and below the plots are state labels, which indicate whether the plot value is high or low.
Creating a Digital Graph
Use NewCtrl to create a digital graph control.
int digGraphCtrl;
digGraphCtrl = NewCtrl (panelHandle, CTRL_DIGITAL_GRAPH_LS, "Digital Graph", 30, 30);
Plotting Data
The digital graph plotting functions behave like SetCtrlVal in that if the digital graph is visible and not overlapped by another control, drawing takes place immediately, without the need to process events.
LabWindows/CVI records all plot lines at once on the digital graph. You do not receive a plot handle for any single plot. Therefore, you must set plot preferences, such as autosizing behavior, for all digital graph plots as a group. You cannot customize individual plots.
When you call PlotDigitalLines, PlotDigitalLinesMultiBus, PlotPackedDigitalLines, or PlotPackedDigitalLinesMultiBus, LabWindows/CVI clears the existing plot lines before it plots the new data.
When you call PlotDigitalLines or PlotDigitalLinesMultiBus, every data array element corresponds to a data sample for a specific line. When using PlotDigitalLines or PlotDigitalLinesMultiBus, it is not necessary for the data array values to be only zero or one. LabWindows/CVI records any zero value as low and records any nonzero value as high. The state labels reflect low and high values as 0 and 1, respectively.
When you call PlotPackedDigitalLines or PlotPackedDigitalLinesMultiBus, LabWindows/CVI can record data samples for more than one line per data array element.
Plotting Data from a Single Bus
Call PlotDigitalLines to plot data from a single bus. The numberOfLines parameter specifies the number of lines to plot in the single bus. In the following example, the data array contains 30 elements and numberOfLines is six, so the function separates the data array into six lines, displaying five data samples per line.
int data[30] = {1, 0, 1, 1, 1, 0, 1, 1, 1, 1, 1, 0, 1, 0, 1, 0, 0, 0, 1, 0, 1, 0, 1, 1, 1, 1, 0, 1, 1, 1};
PlotDigitalLines (panelHandle, PANEL_DIGGRAPH, data, 30, VAL_INTEGER, 6);
Because LabWindows/CVI requires the data within a bus to be interleaved, you do not need to specify the data sequence when you use the PlotDigitalLines function.
Plotting Data from Multiple Buses
Call PlotDigitalLinesMultiBus to plot data from multiple buses.
Use the dataSequence parameter to indicate whether the data is interleaved between buses.
When you plot data from multiple buses, each bus must contain the same total number of lines. However, some of these lines can be invalid. You can pad the data in the data array so that LabWindows/CVI plots a different number of valid lines for each bus. LabWindows/CVI plots only valid lines on the digital graph and ignores padding data. Use the numberOfPlotLinesArray parameter to specify how many valid lines there are in each bus. Each element in the numberOfPlotLinesArray corresponds to a bus.
In the following example, the data array contains 60 elements and numberOfPlotLinesArray is {3, 2}. In this instance, LabWindows/CVI separates the data into six lines, three lines for each bus. However, LabWindows/CVI plots data for only five of the lines because only five of the lines are valid. Bus 0 contains three valid lines, and Bus 1 contains 2 valid lines. The third line in Bus 1 is a padding line, which ensures the buses have the same total number of lines but is not plotted. LabWindows/CVI divides the 60 multiBusData elements between the six total lines, displaying ten data samples for each of the three valid lines in Bus 0, displaying ten data samples for each of the two valid lines in Bus 1, and ignoring the remaining 10 data samples as padding data. Therefore, by padding the data, you can plot different numbers of lines for each bus.
int multiBusData[60] = {1, 1, 0, 1, 1, 0, 1, 1, 1, 0, 1, 0, 1, 0, 1, 1, 0, 0, 0, 0, 1, 0, 1, 1, 1, 0, 1, 0, 1, 1, 1, 0, 0, 1, 1, 1, 0, 1, 0, 0, 0, 1, 0, 1, 1, 1, 0, 0, 1, 0, 1, 1, 1, 0, 1, 1, 1, 1, 0, 0};
unsigned char lines[2] = {3,2};
PlotDigitalLinesMultiBus (panelHandle, PANEL_DIGGRAPH, multiBusData, 60, 2, VAL_INTEGER, VAL_NON_INTERLEAVED, lines);
Plotting Packed Data
When you call PlotPackedDigitalLines or PlotPackedDigitalLinesMultiBus, LabWindows/CVI can record data samples for more than one line per data array element. When data corresponding to multiple lines is packed into a single data array element, each bit of the data array element specifies the value of an individual line. Therefore, the data type of the data array determines the maximum number of lines LabWindows/CVI can plot per bus.
Call PlotPackedDigitalLines to plot packed data from a single bus. Call PlotPackedDigitalLinesMultiBus to plot packed data from multiple buses.
The digital graph might not plot the maximum number of lines in each sample because not every bit corresponds to a valid line. Depending on which function you call, use the mask or maskArray parameter to specify which bits in each element of the data array correspond to valid lines. If you call PlotPackedDigitalLines, specify mask. If you call PlotPackedDigitalLinesMultiBus, specify maskArray. maskArray contains one element, of type dataType, for each bus in the data array. The digital graph displays the result of a bitwise AND on mask/maskArray and the data array.
short int data[20] = {2, 1, 0, 1, 7, 0, 5, 1, 1, 0, 1, 0, 1, 0, 1, 8, 0, 0, 0, 0};
short int maskArray[2] = {0x0001, 0x0003};
PlotPackedDigitalLinesMultiBus (panelHandle, PANEL_DIGGRAPH_2, packedData, 20, 2, VAL_SHORT_INTEGER, VAL_NON_INTERLEAVED, maskArray);
When the maskArray elements are converted to binary format, a non-zero value indicates that a line is valid. Therefore, Bus 0, whose corresponding maskArray element is 0x0001 (binary value: 0000 0000 0000 0001), has one valid line. Bus 1, whose corresponding maskArray element is 0x0003 (binary value: 0000 0000 0000 0011), has two valid lines.
Because the data in this example is non-interleaved, the digital graph records all the data samples for the first bus before it records the data for the second bus. Therefore, the first ten elements of the data array correspond to Bus 0, and the last ten elements correspond to Bus 1.
The following table indicates how the digital graph records the data element-by-element for Bus 0.
| Data Sample | Data Array Element | Data Array Value (short int) | Data Array Value (binary) | Bitwise AND on Data Array Value and Mask Array Value | Recorded Value |
|---|---|---|---|---|---|
| 0 | 0 | 2 | 0000 0000 0000 0010 | 0000 0000 0000 0010 & 0000 0000 0000 0001 0000 0000 0000 0000 |
0 (low) |
| 1 | 1 | 1 | 0000 0000 0000 0001 | 0000 0000 0000 0001 & 0000 0000 0000 0001 0000 0000 0000 0001 |
1 (high) |
| 2 | 2 | 0 | 0000 0000 0000 0000 | 0000 0000 0000 0000 & 0000 0000 0000 0001 0000 0000 0000 0000 |
0 (low) |
| 3 | 3 | 1 | 0000 0000 0000 0001 | 0000 0000 0000 0001 & 0000 0000 0000 0001 0000 0000 0000 0001 |
1 (high) |
| 4 | 4 | 7 | 0000 0000 0000 0111 | 0000 0000 0000 0111 & 0000 0000 0000 0001 0000 0000 0000 0001 |
1 (high) |
| . . . | . . . | . . . | . . . | . . . | . . . |
| 9 | 9 | 0 | 0000 0000 0000 0000 | 0000 0000 0000 0000 & 0000 0000 0000 0001 0000 0000 0000 0000 |
0 (low) |
The following table indicates how the digital graph records the data element-by-element for Bus 1. Notice that the value of the least significant bit corresponds to Line 0, and the value of the next bit corresponds to Line 1.
| Data Sample | Data Array Element | Data Array Value (short int) | Data Array Value (binary) | Bitwise AND on Data Array Value and Mask Array Value | Recorded Value (Line 0/Line 1) |
|---|---|---|---|---|---|
| 0 | 10 | 1 | 0000 0000 0000 0001 | 0000 0000 0000 0001 & 0000 0000 0000 0011 0000 0000 0000 0001 |
1 (high)/0 (low) |
| 1 | 11 | 0 | 0000 0000 0000 0000 | 0000 0000 0000 0000 & 0000 0000 0000 0011 0000 0000 0000 0000 |
0 (low)/0 (low) |
| 2 | 12 | 1 | 0000 0000 0000 0001 | 0000 0000 0000 0001 & 0000 0000 0000 0011 0000 0000 0000 0001 |
1 (high)/0 (low) |
| 3 | 13 | 0 | 0000 0000 0000 0000 | 0000 0000 0000 0000 & 0000 0000 0000 0011 0000 0000 0000 0000 |
0 (low)/0 (low) |
| 4 | 14 | 1 | 0000 0000 0000 0001 | 0000 0000 0000 0001 & 0000 0000 0000 0011 0000 0000 0000 0001 |
1 (high)/0 (low) |
| . . . | . . . | . . . | . . . | . . . | . . . |
| 9 | 19 | 0 | 0000 0000 0000 0000 | 0000 0000 0000 0000 & 0000 0000 0000 0011 0000 0000 0000 0000 |
0 (low)/0 (low) |
Because you can direct LabWindows/CVI to skip bits that do not correspond to valid lines, you can use the PlotPackedDigitalLines or PlotPackedDigitalLinesMultiBus function to plot data that does not have a supported data type. For example, if each of the elements in the data array has five valid bits, you can pass the data array to the PlotPackedDigitalLines function and specify VAL_CHAR as the data type of the data array. You then can pass a pointer to a value of 0x1F to the mask parameter to specify to plot the data from only the first five bits of each element in the data array.
Deleting Plot Lines from a Digital Graph
To remove all plot lines on a digital graph, call ClearDigitalGraph. You do not need to call ClearDigitalGraph before plotting new data on an existing digital graph. When you call PlotDigitalLines, PlotDigitalLinesMultiBus, PlotPackedDigitalLines, or PlotPackedDigitalLinesMultiBus, LabWindows/CVI clears the existing plot lines before it plots the new data.
ClearDigitalGraph (panelHandle, PANEL_DIGGRAPH);
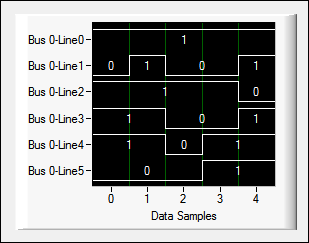
Interleaving Data Samples
The dataSequence parameter in the PlotDigitalLinesMultiBus and PlotPackedDigitalLinesMultiBus functions specifies the order in which LabWindows/CVI assigns the data array elements to different lines and buses. If you choose to interleave the data, the digital graph records the first sample from the first bus, then the first sample from the second bus, and so on. If you choose not to interleave the data, the digital graph records all of the data samples from the first bus, then all of the data samples from the second bus, and so on.
When you call PlotDigitalLinesMultiBus, LabWindows/CVI always assumes the data within an individual bus is interleaved, no matter what value you specify for dataSequence. Therefore, within a given bus, the digital graph records the first data sample for the first line, then the first data sample for the second line, and so on. The digital graph records the second data sample for the first line, and subsequent lines, only when it has recorded the first data sample for all of the lines.
The following images illustrate an interleaved versus a non-interleaved digital graph.
short int lineData[60] = {1, 0, 1, 1, 2, 2, 2, 1, 1, 2, 1, 1, 1, 1, 1, 0, 0, 0, 2, 2, 1, 0, 0, 0, 0, 0, 0, 0, 0, 1, 1, 0, 1, 1, 0, 0, 0, 0, 0, 1, 1, 0, 1, 1, 0, 0, 0, 0, 0, 1, 0, 0, 0, 1, 2, 1, 3, 1, 1, 2};
unsigned char numLines[2] = {3, 3};
// Interleaved data.
PlotDigitalLinesMultiBus (panelHandle, PANEL_DIGGRAPH, lineData, 60, 2, VAL_INTEGER, VAL_INTERLEAVED, numLines);
// Non-interleaved data.
PlotDigitalLinesMultiBus (panelHandle, PANEL_DIGGRAPH_2, lineData, 60, 2, VAL_INTEGER, VAL_NON_INTERLEAVED, numLines);
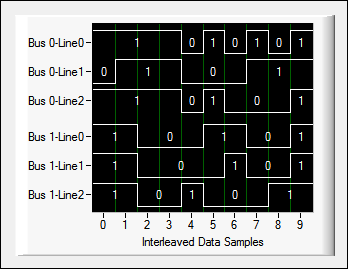
In this example, the data is interleaved. The first three data array elements correspond to the first data sample for Bus 0. One data array element corresponds to each of the lines in the bus. The next three elements correspond to the first data sample for Bus 1. The next three elements correspond to the second data sample for Bus 0, the following three elements correspond to the second data sample for Bus 1, and so on. The following table indicates how the digital graph records the data element-by-element for plotting each data sample for a line.
| Data Array Element | Data Array Value | Bus Number | Line Number | Data Sample |
|---|---|---|---|---|
| 0 | 1 (high) | Bus 0 | Line 0 | 0 |
| 1 | 0 (low) | Bus 0 | Line 1 | 0 |
| 2 | 1 (high) | Bus 0 | Line 2 | 0 |
| 3 | 1 (high) | Bus 1 | Line 0 | 0 |
| 4 | 2 (high) | Bus 1 | Line 1 | 0 |
| 5 | 2 (high) | Bus 1 | Line 2 | 0 |
| 6 | 2 (high) | Bus 0 | Line 0 | 1 |
| 7 | 1 (high) | Bus 0 | Line 1 | 1 |
| 8 | 1 (high) | Bus 0 | Line 2 | 1 |
| 9 | 2 (high) | Bus 1 | Line 0 | 1 |
| 10 | 1 (high) | Bus 1 | Line 1 | 1 |
| 11 | 1 (high) | Bus 1 | Line 2 | 1 |
| . . . | . . . | . . . | . . . | . . . |
| 59 | 2 (high) | Bus 1 | Line 2 | 9 |
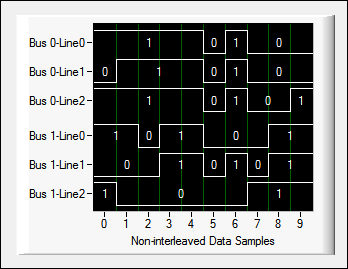
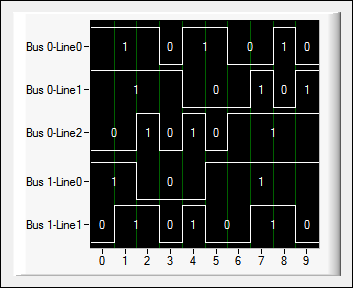
In this example, the data is non-interleaved. The first three data array elements correspond to the first data sample for Bus 0. The next three elements correspond to the second data sample for Bus 0. The digital graph records all ten data samples for Bus 0, which correspond to the first 30 elements of the data array, before it records any data samples for Bus 1. The following table indicates how the digital graph records the data element-by-element. Compare the bus number for each data array element in this example to the bus number for the same data array element in the interleaved example.
| Data Array Element | Data Array Value | Bus Number | Line Number | Data Sample |
|---|---|---|---|---|
| 0 | 1 (high) | Bus 0 | Line 0 | 0 |
| 1 | 0 (low) | Bus 0 | Line 1 | 0 |
| 2 | 1 (high) | Bus 0 | Line 2 | 0 |
| 3 | 1 (high) | Bus 0 | Line 0 | 1 |
| 4 | 2 (high) | Bus 0 | Line 1 | 1 |
| 5 | 2 (high) | Bus 0 | Line 2 | 1 |
| . . . | . . . | . . . | . . . | . . . |
| 30 | 1 (high) | Bus 1 | Line 0 | 0 |
| 31 | 0 (low) | Bus 1 | Line 1 | 0 |
| 32 | 1 (high) | Bus 1 | Line 2 | 0 |
| 33 | 1 (high) | Bus 1 | Line 0 | 1 |
| 34 | 0 (low) | Bus 1 | Line 1 | 1 |
| 35 | 0 (low) | Bus 1 | Line 2 | 1 |
| . . . | . . . | . . . | . . . | |
| 59 | 2 (high) | Bus 1 | Line 2 | 9 |
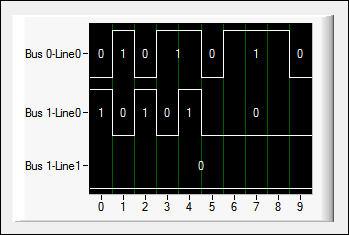
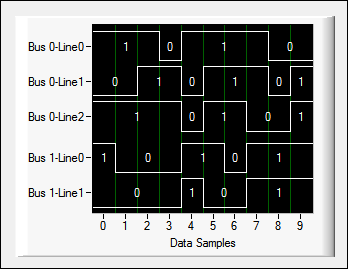
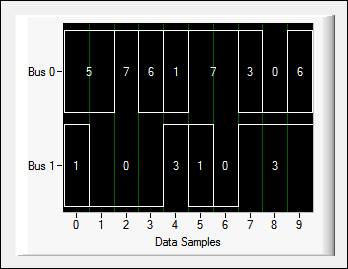
Specifying How the Digital Graph Displays Values
Use the ATTR_DIGWAVEFORM_EXPAND_BUSES attribute to specify whether the digital graph displays individual line plots or combines the values of all lines that comprise a bus into one bus plot.
When you collapse the buses, the plot reflects whether all the lines in a particular bus are low in a single sample, all the lines in the bus are high in a single sample, or there is a mix of high and low lines in a single sample. The following images illustrate a digital graph plotted with the buses expanded versus a digital graph plotted with the buses collapsed. Both images depict how the PlotDigitalLinesMultiBus function plots the same 60-point data array consisting of two buses. Bus 0 has three valid lines, and Bus 1 has two valid lines. Bus 1 also has one padding line, which LabWindows/CVI does not plot on the digital graph.
In the following image, the buses are expanded. The digital graph displays the state label for each line in each bus. The y-axis lists the line labels in "Bus [BUS]-Line [LINE]" format.
SetCtrlAttribute (panelHandle, PANEL_DIGGRAPH, ATTR_DIGWAVEFORM_EXPAND_BUSES, 1);
In the following image, the buses are collapsed. The first sample in this image demonstrates the plot appearance when a bus contains both high and low lines in a single sample. The digital graph displays the state label of the bus as the sum of the high/low values of the lines within the bus. The y-axis lists the bus labels in Bus [BUS] format.
SetCtrlAttribute (panelHandle, PANEL_DIGGRAPH, ATTR_DIGWAVEFORM_EXPAND_BUSES, 0);
Customizing State Labels
State labels indicate the value of the line or bus for each sample. Use the ATTR_DIGWAVEFORM_SHOW_STATE_LABEL attribute to specify whether to show the state labels.
SetCtrlAttribute (panelHandle, PANEL_DIGGRAPH, ATTR_DIGWAVEFORM_SHOW_STATE_LABEL, 1);
If the buses are expanded, the state label value is 0 or 1. A state label value of 0 indicates the line is low for the sample. A state label value of 1 indicates the line is high for the sample.
If the buses are collapsed and you show the state labels, the digital graph displays the hexadecimal value of the lines the bus contains. LabWindows/CVI assigns the high (1) or low (0) value of each line to a bit, with the uppermost line in the bus assigned to the least significant bit. LabWindows/CVI displays the hexadecimal value of the resulting binary number as the state label. For example, in the expanded versus collapsed digital graph example above, the individual line values for the last sample of the first bus are 0 for the uppermost line, 0 for the next line, and 1 for the lowest line in the bus. This results in a binary value of 100, which is equal to 4 in hexadecimal format.
When you call PlotPackedDigitalLines or PlotPackedDigitalLinesMultiBus, LabWindows/CVI includes a value of 0 for each masked out line when it computes the state label values for the collapsed-bus plot. However, LabWindows/CVI does not include masked out lines when it determines whether the plot is all high, all low, or both high and low.
 |
Note When the buses are collapsed, if LabWindows/CVI cannot display the state label for the bus with the greatest number of lines in the space available for one sample, then LabWindows/CVI does not display any of the state labels on the graph. To ensure LabWindows/CVI displays the state labels, resize the graph or plot fewer data samples to increase the amount of space available to display the state labels. |
Customizing Axis Labels
You can replace the numeric labels of digital graph axes with custom text strings.
When you enable ATTR_XUSE_LABEL_STRINGS or ATTR_YUSE_LABEL_STRINGS, the digital graph displays text strings at given axis locations, instead of the default numeric labels. Specify these strings as label/value pairs programmatically using InsertAxisItem. You can use multiline text strings for graph axes.
SetCtrlAttribute(panelHandle, PANEL_DIGGRAPH, ATTR_XUSE_LABEL_STRINGS, 1);
InsertAxisItem (panelHandle, PANEL_DIGGRAPH, VAL_XAXIS, -1, "Sample A", 2.0);
InsertAxisItem (panelHandle, PANEL_DIGGRAPH, VAL_XAXIS, -1, "Sample B", 4.5);
InsertAxisItem (panelHandle, PANEL_DIGGRAPH, VAL_XAXIS, -1, "Sample C", 7.0);
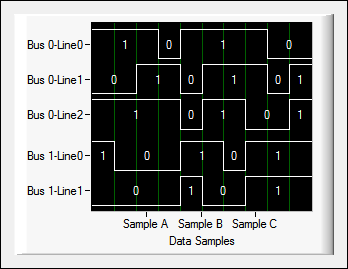
Use the GetAxisItem, ReplaceAxisItem, and DeleteAxisItem functions to manipulate the label/value pairs that you add as custom axis labels.
Each individual string displays only when its associated value falls within the range of the axis.
To customize the appearance of the axis strings, use the ATTR_XLABEL ... or ATTR_YLABEL ... attributes, such as ATTR_XLABEL_ANGLE or ATTR_YLABEL_UNDERLINE.
Customizing Bus and Line Labels
The y-axis lists lines or buses, depending on whether you specify to expand or collapse the buses. If you expand the buses, the y-axis marks lines, each of which LabWindows/CVI denotes with a line label. When you expand the buses, LabWindows/CVI ignores the bus labels you specify. Use the Line Label control in the Edit Digital Graph dialog box or the ATTR_DIGWAVEFORM_LINE_LABEL attribute to specify the line label format. You can use two tokens, [BUS] and [LINE], in the line label specification. When LabWindows/CVI creates line labels, it replaces [BUS] with the number of the current bus and replaces [LINE] with the number of the current line. For example, if you specify "Line [LINE]–[BUS]" as the line label, LabWindows/CVI labels the first digital line in the second bus as Line 0–1. If you collapse the buses, the y-axis marks buses, each of which LabWindows/CVI denotes with a bus label. When you collapse the buses, LabWindows/CVI ignores the line labels you specify. Use the Bus Label control in the Edit Digital Graph dialog box or the ATTR_DIGWAVEFORM_BUS_LABEL attribute to specify the bus label format. When LabWindows/CVI creates bus labels, it replaces [BUS] with the number of the current bus and removes the [LINE] string. For example, if you specify "Bus [BUS]" as the bus label, LabWindows/CVI labels the first bus as Bus 0.
Sizing Plots
You can use the ATTR_DIGWAVEFORM_AUTOSIZE attribute to specify whether to autosize the graph plots. If you autosize the plots, LabWindows/CVI bases the plot height on the height of the digital graph plot area and the number of plots. If you do not autosize the plots, the font size of the state labels determines the height of the digital graph plots.
Because the state label font size determines a minimum plot height, there might not be enough space in the digital graph plot area to display all of the lines. If there is not enough space in the digital graph plot area to display all of the lines, LabWindows/CVI does not display those lines that are below the plot area. You can resize the digital graph plot area to ensure the digital graph displays the necessary data.
Using the Digital Graph with NI-DAQmx
You can use the digital graph to plot data you acquire using NI-DAQmx Library functions. You must use certain NI-DAQmx functions to collect a data array that the digital graph can display properly. If you use PlotDigitalLines or PlotDigitalLinesMultiBus, call DAQmxReadDigitalLines to collect the data array. If you use PlotPackedDigitalLines or PlotPackedDigitalLinesMultiBus, call DAQmxReadDigU8 to collect the data array.
Plotting Data from Multiple Buses for NI-DAQmx
If you plot data for multiple buses, you must configure the dataSequence parameter in the PlotDigitalLinesMultiBus and PlotPackedDigitalLinesMultiBus functions according to whether the NI-DAQmx functions interleave the data when filling the data array. Specify VAL_NON_INTERLEAVED as the dataSequence in the digital graph plotting function if the NI-DAQmx read function fillMode parameter is set to DAQmx_Val_GroupByChannel. Specify VAL_INTERLEAVED if the fillMode parameter is set to DAQmx_Val_GroupByScanNumber.
If you use NI-DAQmx to read data for multiple buses, you also must configure the NI-DAQmx channel creation functions so that they group the lines from one bus into one channel. Call DAQmxCreateDIChan to create the channel for a bus and set the lineGrouping parameter to DAQmx_Val_ChanForAllLines.
Optimizing Graphing Speed
When you set ATTR_SMOOTH_UPDATE to TRUE or enable Smooth Update in the Edit Digital Graph dialog box, the digital graph updates first to an off-screen buffer and then to the screen. This feature optimizes speed when a digital graph is updated after the digital graph has been overlapped or hidden. However, smooth updating slows initial plotting speed and increases memory usage. Enabling smooth updating slows the initial plotting speed because the digital graph updates to the off-screen buffer before plotting to the screen. However, when you move or close a window that covers the digital graph, LabWindows/CVI refreshes the digital graph quickly because the plots already exist in the off-screen buffer.
LabWindows/CVI automatically disables smooth updating of the digital graph when you make the color of the plot background transparent or when a visible item overlaps the plot area.
Specifying Dates and Times for Axis Values
If you use the absolute time format, LabWindows/CVI expects that you plot data that contains the number of seconds since January 1, 1900. This format is compatible with the format the time and GetCurrentDateTime functions use. If you use the relative time format, LabWindows/CVI expects that you plot data that contains the number of seconds since some arbitrary point in time, commonly denoted as t0. For example, you might use the start of a data acquisition process as the arbitrary point in time.
You can call SetAxisTimeFormat to change the format string that specifies how the date/time is displayed on the specified axis. The format string can contain the specifiers that the ANSI C strftime function supports. You also can use an additional specifier, %nf, which represents the fractional part of the seconds, and the @ modifier, which restricts overflow for certain time units.
When the axis is in absolute or relative time format, the value you specify for ATTR_XAXIS_OFFSET is the t0 value. The value you specify for ATTR_XAXIS_GAIN is the Δt value. Call MakeDateTime or GetCurrentDateTime to obtain a time value you can use as the ATTR_XAXIS_OFFSET value. You also can pass time values to the SetAxisScalingMode min and max parameters when you configure the x-axis for manual scaling.
Specifying the Display Format of the X-Axis
Use the ATTR_XFORMAT attribute to specify the display format of the x-axis values. To display date/time data, set the display format to VAL_RELATIVE_TIME_FORMAT or VAL_ABSOLUTE_TIME_FORMAT.
SetCtrlAttribute (panelHandle, PANEL_DIGGRAPH, ATTR_XFORMAT, VAL_ENGINEERING_FORMAT);
Specifying How the Digital Graph Scales
A digital graph contains two axes: the bottom x-axis and the left y-axis. The x-axis indicates the number of samples. For example, if you call PlotDigitalLines with a data array that contains 60 elements and specify that there are six lines, LabWindows/CVI divides the x-axis into ten segments, each of which corresponds to a data sample. You can specify an offset and gain for the x-axis or manually set the x-axis scaling to control what set of values from the data array the digital graph displays.
Call SetAxisScalingMode to set the current scaling mode and range of the x-axis of a digital graph control.
SetAxisScalingMode (panelHandle, PANEL_DIGGRAPH, VAL_XAXIS, VAL_MANUAL, 0, 20);
Call GetAxisScalingMode to obtain the current scaling mode and range of the x-axis of a digital graph control and
|
Note You cannot use the axis scaling mode functions to scale the y-axis. LabWindows/CVI scales the y-axis according to the number of lines and buses you specify and according to whether you enable plot autosizing. |