Edit Installer Dialog Box - Files Tab
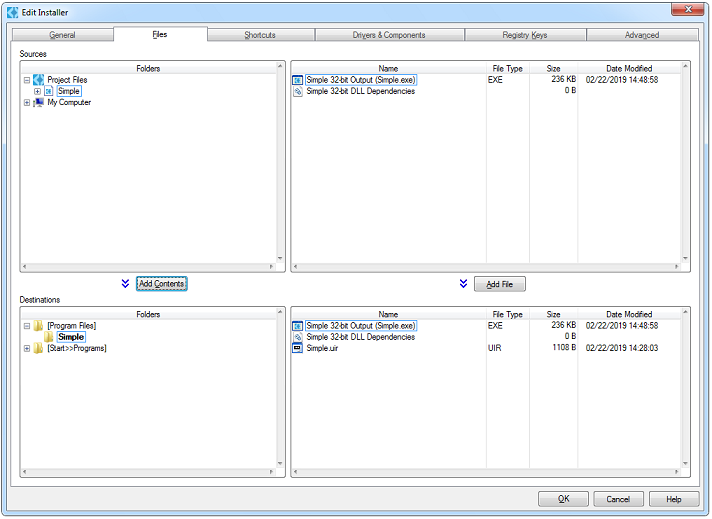
Use the Files tab of the Edit Installer dialog box to specify what files the installer application installs and where it installs these files. The Sources browser displays the files and directories on the local machine. The Project Files item in the directory tree provides quick access to all the files associated with each project in the workspace. The Destinations browser displays the files and directories to install, which are symbolic locations that resolve to the proper paths on the installation computer. Browse under the My Computer folder to access additional files. When you select a folder in one of the trees, LabWindows/CVI displays the contents of the selected folder in the files table.
Adding Files
LabWindows/CVI automatically adds the project output, project DLL dependencies, and any other project files (excluding .h, .c, .fp, and .lib files) to the Destinations browser.
You can add files to the installer in the following ways:
- To add the entire contents of a folder or project to the installation, select the folder or project in the folders tree of the Sources browser and click Add Contents. LabWindows/CVI adds the selected folder to the directory that is currently selected in the Destinations browser.
- To add an individual file, select the file in the files table of the Sources browser and click Add File. LabWindows/CVI adds the selected file to the directory that is currently selected in the Destinations browser.
- You also can drag a folder or files from the Sources browser or from Windows and drop them into the Destinations browser to add them to the installation.
 |
Note Do not install multiple .inf files in one directory. If you have multiple .inf files, create a separate directory for each .inf file. Do not explicitly install your file to the Windows .inf store; it will be implicitly registered and copied to the Windows .inf store during installation. |
- If the target type is executable, Project Name Output is the .exe file.
- If the target type is DLL, Project Name Output is the DLL and import library.
- If the target type is static library, Project Name Output is the .lib file.
|
Note Do not install DLLs for NI components manually. Instead, use the Drivers & Components tab, which ensures that the installer you are creating supports upgrades and does not uninstall needed files. |
Sources browser
The Project Name Bitness Output items represent the release executable, DLL, or static library built by the default configurations of your project. The naming convention for output items built from custom configurations is Project Name Configuration Output. Output items dynamically update based on the current target type and settings of the project.
|
Note In 32-bit installers, output items for 32-bit release configurations are displayed in the Sources browser. In 64-bit installers, all release configuration output items are displayed. |
For a DLL project output group, you can toggle the inclusion of the import library by right-clicking the item and selecting Include/Exclude Import Library.
The DLL dependencies items list DLLs that the LabWindows/CVI linker detects are required for the project. These dependencies typically result when the project includes import libraries or instrument drivers that are associated with DLLs. If LabWindows/CVI does not detect any required DLLs, LabWindows/CVI does not list any DLLs and the size for these items is zero. You must build the project configuration for LabWindows/CVI to populate the corresponding dependencies items with files.
The Project Name Bitness Dependencies items represent the dependencies of the release executable, DLL, or static library built by the default configurations of your project. The naming convention for the dependencies items of custom configurations is Project Name Configuration Dependencies.
Destinations browser
You can drag and drop folders within the Destinations browser to quickly reorganize your installation file structure.
Red text indicates that a file cannot be found. If a directory appears in red text, the directory contains a missing file within it. If you see this, it is likely that a file or directory on disk was moved, renamed, or deleted. In the case of a project output group, it may indicate that the project has not yet been built in release configuration. You can use the Source Path option in the Installation File Options dialog box to view the expected path of the file. If a file you have added to the Destinations browser has been moved on disk, you must remove the file from the browser and add it from its new path. Press <F5> to refresh the view if files have moved on disk while the Edit Installer dialog box has been open. The installer build fails if LabWindows/CVI cannot find one or more of the included files. LabWindows/CVI prompts you to build the necessary project output files when you begin the installer build, so it is not necessary to locate project output files that appear in red text in the Files tab when you edit the installer.
- File Options—Launches the Installation File Options dialog box, which you can use to specify the following options:
- Source Path—Specifies the path on the build computer from which the file is added to the installer. This is not the path to which the file is installed on the target machine. You cannot modify this path directly. To change the source path, remove the file from the Destinations browser and then add the file from the desired location.
- Launch after Installation—Specifies whether to launch the file after installation. If you enable the Launch after Installation option, you can specify the Launch style option. This option specifies which of the following methods the installer uses to launch the file. Select one of the following options:
- Launch and continue—Launches the file and continues launching other files that have the Launch After Installation option enabled without waiting for the file, or its associated launcher, to complete.
- Launch and wait for completion—Launches one program at a time. If you select this option, the installer waits for the currently launched program to complete/exit before launching the next program.
- Launch during Uninstallation—Specifies whether to launch the file during uninstallation.
The Launch after Installation and Launch during Uninstallation options are available only if the file has one of the following extensions: .exe, .bat, .cmd, .com, .py, .rb, .vb, .pl, .reg, .rgs, .ws, or .pif. You cannot specify a launch order for multiple files launched this way. If you enable the Launch after Installation or Launch during Uninstallation option, you can specify the Cmd line args option. This option specifies the command line arguments to pass to the file. You can use the following variables in the command line arguments, which resolve to the specified strings. All paths are terminated by backslash characters.- %dest—The path to the application installation directory, which the user may change at install time
- %src—The path to the directory on the target computer from which the installer is run
- %cvidir—The path to the LabWindows/CVI directory
- %nidir—The path to the root directory where NI software is installed
- %name—The application name
- %%—Use this variable when you must place a single '%' in the command line
For example, assume the following command line arguments:
-I "%destmyapp.txt" /from "%src" "%name"
The actual command line passed to the executable is structured similarly to the following command line (values vary based on user choices and installation title options):
-I "c:\myapp\myapp.txt" /from "c:\temp\" "My App Setup" - Read-only—Specifies whether to make the installed copy of the selected file read only.
- Hidden—Specifies whether to make the installed copy of the selected file hidden.
- System—Specifies whether to make the installed copy of the selected file a system file.
- Register as ActiveX server—Specifies whether to attempt to register the selected file, regardless of file type, as an ActiveX server. The installation does not display any warnings or errors if the file fails to successfully register as an ActiveX server.
- Remove File(s)—Removes the selected file(s) from the installation. You also can press <Delete> to remove files.
Modifying Files to Install
You can use context menus in each of the trees in the Files tab to organize and search the specified tree and modify what files are installed in what locations. The following items are available in the folders tree in the Destinations browser. The menu items that are available depend on what folder is currently selected.
- New Subdirectory—Creates a new subdirectory under the selected directory.
- Remove Directory—Removes the selected directory and its contents from the installation. You also can press <Delete> to remove a directory. This option is not available for the application directory.
- Rename—Allows you to edit the name of the selected directory. You also can press <F2> to rename the selected directory. You cannot give a directory the same name as an existing directory in the same location.
- Refresh—Refreshes the view so that it matches what is on disk.
- Set as Application Directory—Specifies the selected directory as the application directory, which the user can relocate during the installation. This directory typically contains all application files, except for files that must be installed to a specific system location. You may not specify a symbolic install location as the application directory. The application directory is indicated by a bold label.
- Make Writable for All Users—Unlocks the selected subdirectory permanently so that it is writable by any authenticated user, regardless of that user's access permission on the target computer. This option is available for all subdirectories you create in the [Program Files], [Program Data], and [Public Documents] locations, except for the Microsoft and National Instruments subdirectories.
- Root Drive—Specifies a drive letter to use at installation time. Select a root drive if you need to specify an absolute path for files. Users have the option to change the letter during installation. If the root drive you specify is not available, the installation fails.
- All Installation Locations—Lists the available installation locations. These symbolic locations automatically resolve to the actual directory paths on the target machine during installation. The actual paths can vary based on operating system version, language, and configuration. You can select from the following list of common Windows and National Instruments locations.
Location Description Typical Directory Path on Windows [Program Files] The Program Files folder. C:\Program Files [Program Files (x86)] The Program Files folder for 32-bit applications. Note This option is available only if you are creating a 64-bit distribution. Windows 10/8.1/7/Server 2012/Server 2008 (64-bit) C:\Windows\Program Files (x86) [Desktop] The Desktop folder (all users). Files installed here appear on every user's Windows desktop. C:\Users\Public\Public Desktop [Windows Volume] The root directory of the partition containing the currently running Microsoft Windows installation. C:\ [Windows] The Windows folder. C:\Windows [System] The System folder. C:\Windows\System32 [SysWOW64] The Windows on Windows 64 folder. Note This option is available only if you are creating a 64-bit distribution. Windows 10/8.1/7/Server 2012/Server 2008 (64-bit) C:\Windows\SysWOW64 [System16] The folder for 16-bit system DLLs. Note This option is available only if you are creating a 32-bit distribution. C:\Windows\System [Program Data] The Program Data or Application Data folder. C:\ProgramData [Public Documents] The Documents folder available to all users. C:\Users\Public\Public Documents [Common Files] The Common Files folder. C:\Program Files\Common Files [Common Files (x86)] The Common Files folder for 32-bit applications. Note This option is available only if you are creating a 64-bit distribution. Windows 10/8.1/7/Server 2012/Server 2008 (64-bit) C:\Program Files (x86)\Common Files [Start»Programs] The Program Menu folder (all users). Files installed here appear in every user's Windows Start»Programs menu. Applications commonly install shortcuts in this directory. C:\ProgramData\Microsoft\Windows\Start Menu\Programs [Start Menu] The Start Menu folder (all users). Systems using the Windows-XP-style Start menu display the contents at the top of the Start»Programs menu. C:\ProgramData\Microsoft\Windows\Start Menu [Startup] The Startup folder (all users). Files installed here are run whenever any user starts a Windows session. C:\ProgramData\Microsoft\Windows\Start Menu\Programs\Startup [Temp] The current user's Temp folder. C:\Users\[Logon User]\AppData\Local\Temp [Favorites] The current user's Favorites folder. C:\Users\[Logon User]\Favorites [Fonts] The system Fonts folder. C:\Windows\Fonts [Templates] The Templates folder (all users). C:\ProgramData\Microsoft\Windows\Templates [Send To] The current user's SendTo folder. Shortcuts installed in this folder appear in the Send To menu that appears when a file is right-clicked. C:\Users\[Logon User]\AppData\Roaming\Microsoft\Windows\SendTo [National Instruments] The directory into which National Instruments installs software. The user can change this folder at the time of installation. C:\Program Files\National Instruments [National Instruments (x86)] The directory into which National Instruments installs 32-bit software. The user can change this folder at the time of installation. Note This option is available only if you are creating a 64-bit distribution. Windows 10/8.1/7/Server 2012/Server 2008 (64-bit) C:\Program Files (x86)\National Instruments [LabVIEW] The directory containing the highest installed version of LabVIEW. If LabVIEW is not installed on the system, the installer uses a default directory. C:\Program Files\National Instruments\LabVIEW [CVI] The directory containing the highest installed version LabWindows/CVI. If LabWindows/CVI is not installed on the system, the installer uses a default directory. C:\Program Files\National Instruments\CVI [CVI Shared] The LabWindows/CVI shared installation directory, which contains files such as .lib, .fp, and .h files that you want to use from multiple versions of LabWindows/CVI. C:\Program Files\National Instruments\Shared\CVI [CVI Public Documents] The LabWindows/CVI public documents directory, which contains files that your users can see and modify. Files that you might consider installing in this folder include example programs. C:\Users\Public\Documents\National Instruments\CVI Note On Windows 10/8.1/7/Server 2012/Server 2008, users can modify files in this location without administrator access. [IVI Std Root] The IVI Standard Root directory. If IVI is not installed on the system, the installer uses a default directory. Note If you use the Build»Distributions»Build distribution name option to create an installer for an IVI instrument driver, your installer will not be compliant with the installation requirements defined by the IVI Foundation. Use the IVI Installer Creator to create a compliant IVI driver installer. The IVI Installer Creator is available under Tools»IVI Installer Creator in the LabWindows/CVI installer feature tree. You must have installed the IVI Compliance Package, which is available from the NI Device Drivers media, to install the IVI Installer Creator. Windows 10/8.1/7 (32-bit) C:\Program Files\IVI
Windows 10/8.1/7/Server 2012/Server 2008 (64-bit) C:\Program Files\IVI and
C:\Program Files (x86)\IVI[VXI PnP] The VXIplug&play root directory. If VXI is not installed on the system, the installer uses a default directory. Windows 10/8.1/7 (32-bit) C:\Program Files\IVI Foundation\VISA
Windows 10/8.1/7/Server 2012/Server 2008 (64-bit) C:\Program Files\IVI Foundation\VISA and
C:\Program Files (x86)\IVI Foundation\VISA[VXI PnP OS] The VXIplug&play framework directory. If VXI is not installed on the system, the installer uses a default directory. Windows 10/8.1/7/ (32-bit) C:\Program Files\IVI Foundation\VISA\WinNT
Windows 10/8.1/7/Server 2012/Server 2008 (64-bit) C:\Program Files\IVI Foundation\VISA\Win64 and
C:\Program Files (x86)\IVI Foundation\VISA\WinNT