Initial Patch Setup Dialog Box (Windows Installer Patch)
Use the Initial Patch Setup dialog box to configure settings for your Windows installer patch. To access the Initial Patch Setup dialog box, complete the following steps:
- Select Build»Distributions»Manage Distributions.
- Click the New button in the Manage Distributions dialog box.
- Select Windows Installer Patch as the Type option in the New Distribution dialog box and click OK.
This dialog box displays the following image and contains the following options:
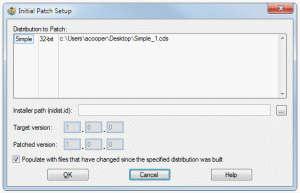
- Distribution to Patch—Select the distribution on which to base the patch. LabWindows/CVI lists the Windows Installer distributions in the workspace in the list.
- Installer Path (nidist.id)—Browse to the folder that contains the nidist.id file of the distribution on which you are basing the patch. The nidist.id file is typically located in the Volume folder in the cvidistkit.ProjectName folder.
- Target version—Displays the version of the distribution on which you are basing the patch.
- Patched version—Enter the version for the patch. You must first select a valid installer path before you can modify the Patched version. The Patched version must be greater than or equal to the distribution you are patching.
- Populate with files that have changed since the specified distribution was built—Select this option if you want to automatically include files in the patch that have been updated since you built the distribution. If you deselect this option, LabWindows/CVI does not include any files, and you must manually include files in the Files tab of the Edit Installer dialog box.
When you click the OK button in this dialog box, the Edit Installer dialog box opens.