Edit Installer Dialog Box - Advanced Tab
Use the Advanced tab of the Edit Installer dialog box to specify advanced options for the installer application.
 |
Note The Advanced tab for complete distributions differs from the Advanced tab for patches. |
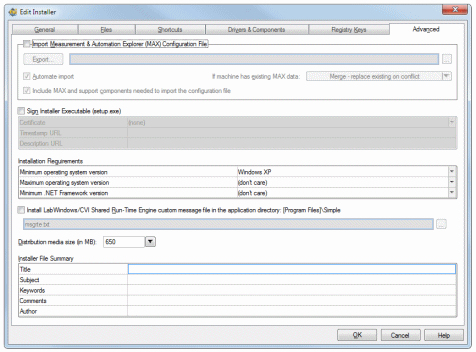
The Advanced tab provides the following options:
- Installer Executable Name—Specifies the filename of the executable.
- Import Measurement & Automation Explorer Configuration File—Enable this option to provide the path to an NI Measurement and Automation Explorer (MAX) hardware configuration file and have the file imported as part of the installation. The installer schedules to import the configuration into MAX the next time the computer is rebooted.
If the installer includes an NI device driver for recently installed hardware on the target computer, the user must complete the Windows Add Hardware Wizard before importing the MAX settings. The import process prompts the user to wait until the Add Hardware Wizard completes before proceeding with the import.
Otherwise, if the installer is upgrading an existing NI device driver and/or the hardware was previously installed and operating properly, the import process does not prompt the user to complete the Add Hardware Wizard.
If the import process is cancelled or fails, the user can manually import the new configuration file once the problem is corrected. To restart the import process, select File»Import within MAX.
Note You must have MAX 4.0 or later installed on the target computer to use this option. If MAX 4.0 or later is not installed on the target computer, the configuration fails and Windows displays an error dialog box upon reboot.
If you enable the Import Measurement & Automation Explorer Configuration File option, you can specify the following additional options:- Automate import—If enabled, MAX will attempt to import the configuration file without user interaction. In some cases, you may still be required to complete the import interactively.
For example, if the installer includes an NI device driver for recently installed hardware on the target computer, you must complete the Windows Add Hardware Wizard before importing the MAX settings. The import process prompts the user to wait until the Add Hardware Wizard completes before proceeding with the import.
Otherwise, if the installer is upgrading an existing NI device driver and/or the hardware was previously installed and operating properly, the import process does not prompt you to complete the Add Hardware Wizard.
If the computer has existing MAX data and Automate import is checked, this option allows you to specify how MAX should handle existing hardware configuration settings. - Merge - replace existing on conflict—The resulting setup is a union of the previously stored and newly imported configurations. If the MAX import process encounters a naming conflict between an existing item and a new item, the new item overwrites the existing item.
- Merge - preserve existing on conflict—The resulting setup is a union of the previously stored and newly imported configurations. If the MAX import process encounters a naming conflict between an existing item and a new item, the existing item is preserved.
- Replace existing configuration data—Any existing configuration settings are discarded and are replaced by the new configuration. If the import process fails to complete successfully, you can manually import the new configuration file once the problem is corrected. To restart the import process, select File»Import from within MAX.
- Include MAX and support components needed to import the configuration file—If enabled, the installer automatically includes MAX and any additional MAX support products required to import the hardware configuration in the installer, if they are present on the build computer. Including MAX using the Drivers and Components tree in the Drivers & Components tab is not a sufficient alternative to enabling this option because that method does not include the necessary support components.
If this option is enabled but MAX 4.0 or later is not installed on the build computer, LabWindows/CVI logs a warning when you build the installer. In this case, the configuration file import succeeds only if MAX version 4.0 or later is already installed on the target computer.
Disable this option only if you know that the target computer has the software required to import the hardware configuration installed already and you want to keep the installer as small as possible.
- Automate import—If enabled, MAX will attempt to import the configuration file without user interaction. In some cases, you may still be required to complete the import interactively.
- Sign Installer Executable—Enable this option to sign the installer you create with the Edit Installer dialog box. Signing the installer executable is a separate step from signing your executable or DLL.
- Certificate—Select a signing certificate to use to sign your installer. This list displays certificates that are installed in the My certificate store. LabWindows/CVI supports signing only with certificates installed in the My certificate store.
You also can have a certificate as a file, but the file does not appear in this field. You must import the certificate from the file into the My certificate store so that LabWindows/CVI can locate it. - Timestamp URL—Specify a timestamp that ensures that the digital signature was valid at the time it was issued.
This option is helpful because signing certificates expire. If your certificate expires, Windows cannot validate the certificate, and the software might not install or run. With a timestamp, you can ensure that the digital signature is still valid, even if your certificate expires. - Description URL—Specify a URL that appears when your users right-click the installer executable and look at the digital signature. For example, you can specify your company URL.
- Certificate—Select a signing certificate to use to sign your installer. This list displays certificates that are installed in the My certificate store. LabWindows/CVI supports signing only with certificates installed in the My certificate store.
- Installation Requirements—Specifies the OS and .NET Framework versions required to install the application. The table contains the following options:
- Minimum operating system version—Specifies the minimum version of the OS on which the installer application can run. LabWindows/CVI supports building installers for Windows 7 Service Pack 1 and later.
- Maximum operating system version—Specifies the maximum version of the OS on which the installer application can run.
- Minimum .NET Framework version—Specifies the minimum version of the .NET Framework that must be present on the system for the installer to run.
- Install custom Runtime message file—Specifies a custom Runtime message file to install to the application directory specified in the Files tab. The message file applies only to the application for which you are building the distribution and does not upgrade the existing Runtime message file.
You can use this option to install a translated message file.Note If your application calls a DLL that also has a custom Runtime message file, the custom Runtime message file belonging to the DLL might not be found depending on where the file is installed to. LabWindows/CVI expects all custom message files for the application to be installed to the same directory as the application. - Distribution media size (in MB)—Specifies the size of the media on which you plan to distribute the installer. You can select common media sizes from the provided list in the pull-down menu or enter a custom size; when you enter a custom size in this field, LabWindows/CVI selects Other in the pull-down menu. LabWindows/CVI divides the installer into volumes depending on the size you specify. The media size must be at least as large as the largest driver in the distribution. If LabWindows/CVI cannot fit a volume into the size you specify, it displays a warning in the build log in the Building Distribution dialog box.
Note A minimal installer that does not include the LabWindows/CVI Runtime is approximately 8 MB. - Installer File Summary—Use this table to edit the properties of the .msi file LabWindows/CVI creates for the application. After LabWindows/CVI creates the .msi file, you can view or edit these properties by right-clicking the file and selecting Properties. You can specify the following options:
- Title—The .msi file title, which appears in the Title option of the Windows Properties dialog box Summary tab. This is different than the .msi filename.
- Subject—The .msi file subject, which appears in the Subject option of the Windows Properties dialog box Summary tab.
- Keywords—The keywords associated with the .msi file, which appear in the Keywords option of the Windows Properties dialog box Summary tab.
- Comments—The comments associated with the .msi file, which appear in the Comments option of the Windows Properties dialog box Summary tab.
- Author—The .msi file author, which appears in the Author option of the Windows Properties dialog box Summary tab.